As covered in a previous post, boot is an all-around useful tool for building clojure applications, but one feature in particular has proven a adjuncti finalum [*] : boot lets you do clojure scripting. This elevates clojure to the same high productivity of scripting languages (like my personal favorite, Python), but bakes in dependency management and other goodies. This allows the user to build complexity iteratively, in a straight-forward manner (verses generating a bunch of boiler plate project code and building a package). This article explores boot scripting further, illustrating how boot can be used to quickly and easily develop and distribute applications and tools. There's also discussion about getting your jars into Clojars, and setting up a simple bare-minimum Maven repository.
| [*] | I originally had "interfectorem pluma" to represent "killer feature" in Latin, however thanks to danielsmulewicz in #hoplon reminding me how stupid Google Translate can be, I consulted a Latin->English dictionary and Wikipedia to attempt an uneducated, but better Latin equivalent. I mention it here because it's all extremely funny, as interfectorem pluma literally translates to something like "feather murderer". In my amateur approach adjuncti finalum literally translates to something like "characteristic of the ultimate goal", which, if even remotely correct, is pretty accurate. |
Setup
As I've covered before, boot is easy to install. All you need is a JDK and the boot executable. Here's a recap for the Linux and OSX crowd, just to get you going (we'll assume you already have a JDK set up, and have wget):
$ wget https://github.com/boot-clj/boot-bin/releases/download/latest/boot.sh
$ mkdir -p ~/bin
$ mv boot.sh boot && chmod a+x boot && mv boot ~/bin/

$ echo "export PATH=\$PATH:\$HOME/bin" >> ~/.bash_profile
$ export PATH=$PATH:$HOME/bin
Explanation
First we need to download the boot executable script. The .sh extension indicates it's a shell script.
Then a directory is created with mkdir for personal executables (binaries, hence bin). We use the -p flag to tell mkdir that any intermediary directories should be created. -p also silences any errors for already-existing directories.
The tilde ~ is an alias for the current user's home directory. We use it here because the specific path for home is variable depending on both the user, and the operating system. For example, if my log in is jjmojojjmojo, on Linux, my home directory is likely /home/jjmojojjmojo. But on some systems, it will be /var/users/jjmojojjmojo. On MacOS, home directories are in /Users. See this wikipedia article for more information.
Finally, we string a few commands together using &&. && will execute the following command if the preceding one succeeds (has a 0 return value). Here's what each part does:
- We rename (move) the
boot.shtoboot. This way we can typebootinstead ofboot.shto execute boot commands later on. - We change the mode of the
bootscript to include execute for the group, owner, and other bits. This allows the script to be executed like any other command - and by anyone who can read it. Using this approach (as opposed to, saychmod 755) only modifies the execute bit for each class. More info. - Finally, we move the
bootscript to our personal~/bindirectory, so the shell can find it when we set that up in the next step.
Then we need to update our $PATH environment variable so the shell can find our new executable boot.
The shell looks for executables in a variable called $PATH. $PATH is a list of directories, that are searched in sequential order.
We can get the shell to find our boot script by adding our personal bin directory to the end of that variable. More info.
By adding an export command to the end of our ~/.bash_profile, we can ensure this modification to our shell happens every time we log in, or start our terminal app. Other environments, and shells have different files that are used this way.
We accomplish this by using the echo command. echo sends data to the terminal output (stdout). We redirect that output to be appended to ~/.bash_profile, using two greater-than symbols (>>). More info.
Note that we escape the dollar signs in the $PATH and $HOME variables. This prevents the shell from expanding the current value for those variables before adding the export to ~/.bash_profile.
Finally, we make the change take effect in our current shell by running the export (without the escaped dollar signs).
Note
Depending on your distribution, and shell, the way to make this change permanent may be different. Most shells read a special file in your home directory. Look for files like ~/.bashrc, ~/.profile, etc.
For good measure, lets ask boot to update itself:
$ boot -u
Making Boot Faster
Adding the following to your environment will speed boot startup by a vast amount. You can either run this command in your terminal, or make it permanent by putting this line into ~/.bash_profile or similar other files for your particular shell. See the JVM-Options page in the boot documentation for details, and other ways to incorporate these settings into your projects:
export BOOT_JVM_OPTIONS="-client -XX:+TieredCompilation -XX:TieredStopAtLevel=1 -Xverify:none"
A Simple Script
For this article, we'll start with an example of a useful application that grabs the most recent tweet from the Nihilist Arby's twitter feed. A great addition to your MOTD to de-motivate users overzealous about the fact that they have SSH privileges to your machine. 😀
Twitter API Tokens
Before we begin, set up an application and obtain a consumer key using a twitter account for which you have the username and password. For the sake of security, you may want to limit the application's access to read only. The tokens can be used to read anything in the account, and any private feeds the account has access to, so be careful.
Quick Note: Development Deviations
Since we're not building anything right now, or utilizing the task infrastructure, we don't need a build.boot file. However, to make prototyping a bit easier, it's useful to create one that will load our dependencies or libraries we're playing with, when we run boot repl:
1 | (set-env! :dependencies '[[twitter-api "1.8.0"]]) |
Alternatively, we can pre-load dependencies on the command line when we run the repl task:
$ boot -d twitter-api:1.8.0 repl
The Script: Version 1
For the first pass of the script, we will hard-code our credentials, and not bother taking any command-line arguments. This illustrates what a bare-minimum boot script looks like.
1 2 3 4 5 6 7 8 9 10 11 12 13 14 15 16 17 18 19 20 21 22 23 24 25 26 27 28 | #!/usr/bin/env boot (set-env! :dependencies '[[twitter-api "1.8.0"]]) (use '[twitter.oauth] '[twitter.api.restful] '[twitter.callbacks] '[twitter.callbacks.handlers]) (import '(twitter.callbacks.protocols SyncSingleCallback)) (defn printer [response] (println (:text (second response)))) (defn -main [] (statuses-user-timeline :oauth-creds (make-oauth-creds "[YOUR CONSUMER KEY]" "[YOUR CONSUMER SECRET]") :callbacks (SyncSingleCallback. (comp printer response-return-body) exception-print exception-print) :params {:screen-name "nihilist_arbys" :count 2})) |
Making this script executable, it can be run on the command line. The result will be the last tweet. I named my script downer, but you can name it however you'd like:
$ chmod +x downer
$ ./downer
Rip it to shreds. Put it on a bun. Slather it in horsey sauce. Watch them line up to gorge. Feeding pigs to pigs. Arbys: a flat circle.
Tip
You may see some output on stderr about some missing logging libraries. For now, these can be ignored. See Appendix: Getting Rid Of Log4J Notices.
Explanation
The first 2 lines are what make this a boot script. The set-env! function and general information about environments can be found in the boot documentation.
First we have the "shebang" line, which tells the operating system what interpreter to use to run the script. In this case, we're taking advantage of the convention of having /bin/env available in the same location on most systems, to figure out where boot is.
Then we declare our sole dependency on twitter-api.
lines 4-9 are typical use/import statements. In a boot script, a special namespace is created, called boot.user. You can alternatively load external code using the ns form. The example code could be replaced thusly:
1
2
3
4
5
6
7
(ns boot.user
  (:use [twitter.oauth]
        [twitter.api.restful]
        [twitter.callbacks]
        [twitter.callbacks.handlers])

  (:import [twitter.callbacks.protocols SyncSingleCallback]))
Lines 11-28 are the "meat" of the program. Boot will execute the first -main function that it finds in a script. For details about what the code is doing, see the twitter-api and the twitter restful api documentation. In essence, the app makes a RESTful call to the twitter API, providing an API key and the necessary parameters. We then use a special callback to print the message from the result of that call.
Distribution/Installation: Mark 1
The real beauty of this boot script we have, is that it is a self-contained entity. We can send it to anyone who has boot and a JDK installed. They can place the script anywhere they like. Dependencies are automatically downloaded the first time its run.
A Not-So-Simple Script
Boot scripting provides a natural progression from "just a script" to "full-blown application".
Boot scripts contain all of the functions needed to run, but this poses some problems:
- as functionality grows, the script can quickly become unruly
- because of the way boot encapsulates the running code, it can be difficult to debug.
The solution to both of these problems is to move code into other files, and use the -main function in your boot script to invoke that code.
This is handled quite simply by utilizing boot's :source-paths environment option, and a little refactoring.
We'll construct a directory named src, and create a last_tweet.clj file. In it, we'll declare a new namespace, last-tweet, and move the code there.
src/last_tweet.clj:
1 2 3 4 5 6 7 8 9 10 11 12 13 14 15 16 17 18 19 20 21 22 23 24 25 | (ns last-tweet (:use [twitter.oauth] [twitter.api.restful] [twitter.callbacks] [twitter.callbacks.handlers]) (:import [twitter.callbacks.protocols SyncSingleCallback])) (defn printer [response] (println (:text (first response)))) (defn last-tweet [] (statuses-user-timeline :oauth-creds (make-oauth-creds "[YOUR CONSUMER KEY]" "[YOUR CONSUMER SECRET]") :callbacks (SyncSingleCallback. (comp printer response-return-body) exception-print exception-print) :params {:screen-name "nihilist_arbys" :count 1})) |
Note
Our namespace has a dash (-) in it - this isn't supported in clojure file names. So instead, we use an underscore (_) in the name of the file.
This code is copied from the original boot script, almost verbatim. We've just made use of our own namespace, and renamed -main to last-tweet.
Here is the new downer script:
1 2 3 4 5 6 7 8 9 10 | #!/usr/bin/env boot (set-env! :dependencies '[[twitter-api "1.8.0"]] :source-paths #{"src"}) (require '[last-tweet :refer [last-tweet]]) (defn -main [] (last-tweet)) |
This greatly simplifies our script, and does a better job of separating our concerns. We've segregated the application logic from the user interface. We've set ourselves up for some additional refactoring to make things more flexible.
We can add many namespaces to the src directory. We can also add other source paths - the :source-paths directive is a hash set.
Now we can refactor the last-tweet/last-tweet function to take credentials and the twitter account to get a tweet from as arguments:
13 14 15 16 17 18 19 20 21 22 23 24 25 | (defn last-tweet [account consumer-id consumer-secret] (statuses-user-timeline :oauth-creds (make-oauth-creds consumer-id consumer-secret) :callbacks (SyncSingleCallback. (comp printer response-return-body) exception-print exception-print) :params {:screen-name account :count 1})) |
We've gone from a hard-coded function to one that is more general-purpose.
Now we can utilize boot's extremely useful defclifn macro and boot's task option DSL to wrap our function, allowing the user to provide the values on the command-line, creating a proper user interface.
1 2 3 4 5 6 7 8 9 10 11 12 13 14 15 16 17 18 19 20 21 22 23 24 25 26 27 28 29 | #!/usr/bin/env boot (set-env! :dependencies '[[twitter-api "1.8.0"]] :source-paths #{"src"}) (require '[last-tweet :refer [last-tweet]] '[boot.cli :as cli]) (cli/defclifn -main "Prints the last tweet from the given account. Requires twitter user app authentication tokens. The authentication tokens can be set using the command-line options below, or in the TWITTER_ID and TWITTER_SECRET environment variables. USAGE: downer [options] [twitter account]" [k consumer-id ID str "Consumer id from Twitter" i consumer-secret SECRET str "Consumer secret from Twitter"] (let [account (nth *args* 0 "nihilist_arbys") consumer-id (or (System/getenv "TWITTER_ID") (:consumer-id *opts*)) consumer-secret (or (System/getenv "TWITTER_SECRET") (:consumer-secret *opts*))] (if (or (nil? consumer-id) (nil? consumer-secret)) (println "ERROR: you must provide twitter credentials. Try -h") (last-tweet account consumer-id consumer-secret)))) |
Explanation
- The docstring for the function is used as the "usage" message when the user passes the -h flag.
- The task option DSL allows for a pre-processing step to be defined for each value. In this case, we used str, which treats each argument as a string. This can be changed to one of many very useful options, including keywords, symbols, files (which take a path and return a java.io object) and many more, including complex compound values.
- There are two special variables that are provided by the defclifn macro: *opts* and *args*. *opts* contains all of the processed options as defined in the argument list, in the form of a map. *args* contains all other values passed on the command line, as a vector. We use the *args* variable to allow the user an intuitive way to override the default twitter account.
- The use of environment variables as alternatives to CLI options is illustrated here. It's very useful for deployment of more complex applications, and keeps sensitive information out of the process list.
- We've added some error handling to give the user a nice message if they neglect to set their credentials.
Now we can see command-line output:
$ ./downer
ERROR: you must provide twitter credentials. Try -h
The output of ./downer -h:
$ ./downer -h
Prints the last tweet from the given account. Requires twitter user app
authentication tokens. The authentication tokens can be set using the
command-line options below, or in the TWITTER_ID and TWITTER_SECRET
environment variables.

USAGE: downer [options] [twitter account]

Options:
  -h, --help                    Print this help info.
  -k, --consumer-id ID          ID sets consumer id from Twitter.
  -i, --consumer-secret SECRET  SECRET sets consumer secret from Twitter.
We set the environment variables, and try getting the last post from a different, possibly more depressing account:
$ export TWITTER_ID="XXXXXXXXXXXXXXXXX"
$ export TWITTER_SECRET="YYYYYYYYYYYYYYYYYYYYYYYYY"
$ ./downer jjmojojjmojo
FINALLY... this just makes getting the sweet, sweet carrot dogs that much easier... http://t.co/TWYer14JH4 @adzerk
Distribution/Installation, Mark 2
Pulling some of the code out into a separate file has made our little script cleaner, but now distributing the file is slightly more complicated, since we have to provide the script access to the code we factored out.
There are several ways to handle this:
- Distribute the source code via git, or a tarball. The :source-paths environment parameter can be changed if needed to point to a proper location such as /opt/downer, or /usr/local/lib/downer.
- Build a library jar file. The jar file can be installed into a local maven repository, or a public one like clojars.
The first option is sub-optimal. It can be made somewhat easier with help from fpm, but it's still a bit cumbersome. The real beauty of boot scripting is we don't have to bother with complex installation procedures.
We can leverage the power of java jar files (which are just zip files under the hood) to contain our source code and other artifacts.
This makes the jar file the best path. Once the jar is installed into a maven repository the script can reach, the script can once again be distributed as a simple stand-alone text file.
We can use boot for this. That's what it does!
Check out all you ever wanted to know about making jar files and distributing them in the unoffical followup to this post..
Appendix: Getting Rid Of Log4J Notices
You may have noticed that you get a bunch of warning messages when running our code:
$ ./downer jjmojojjmojo
SLF4J: Failed to load class "org.slf4j.impl.StaticLoggerBinder".
SLF4J: Defaulting to no-operation (NOP) logger implementation
SLF4J: See http://www.slf4j.org/codes.html#StaticLoggerBinder for further details.
FINALLY... this just makes getting the sweet, sweet carrot dogs that much easier... http://t.co/TWYer14JH4 @adzerk
SLF4J is the Simple Logging Facade For Java. It allows for deployment-time configuration of logging in an application. This means you build your app against the SLF4J API, and when you deploy your application at some later time, you can use whatever logging back-end you want. This is a huge deal for most apps, but in our case, a simple CLI tool that grabs a tweet, it's probably nothing we really need to care about.
The error concerns SLF4J trying to find a logging back-end, and failing to find one. It's looking for the default backend, named StaticLoggerBinder. So we have to fix this to get the warnings to dissapear.
The link provided in the output tells us what needs to be done:
This warning message is reported when the org.slf4j.impl.StaticLoggerBinder class could not be loaded into memory. This happens when no appropriate SLF4J binding could be found on the class path. Placing one (and only one) of slf4j-nop.jar slf4j-simple.jar, slf4j-log4j12.jar, slf4j-jdk14.jar or logback-classic.jar on the class path should solve the problem.
To do this for our project, we just need to add a backend to our dependencies in build.boot.
Since we don't need logging for our project, we'll choose the slf4j-nop back-end.
To figure out exactly what the dependency specification looks like, we can search in the Maven Central Repository.
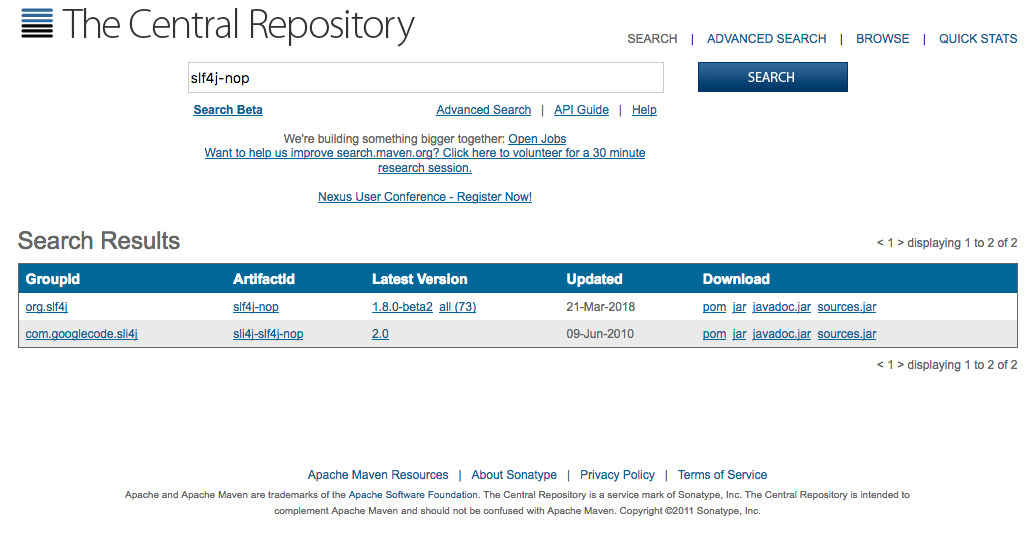
Screen grab of Maven Central search results for 'slf4j-nop'
From the screen grab above, we can derive the dependency specification: [group-id/artifact-id "version"].
As such, in our case, our spec will be [org.slf4j/slf4j-nop "1.8.0-beta2"].
Tip
We might want to be weary of using beta code, even if it isn't important to our project.
To find the latest stable version of the libary, we can click on the "All" link next to the latest version. This displays a list of every single release, where we see the latest stable version (at time of writing) is 1.7.25.
So now, our set-env! call looks like this (using the latest stable version of slf4j-nop):
1 2 3 4 | (set-env! :dependencies '[[twitter-api "1.8.0"] [org.slf4j/slf4j-nop "1.7.25"]] :source-paths #{"src"}) |
After rebuilding our jar, or running our boot script again, we'll see the SLF4J warnings have disapeared.