This is part one of a three-part series. This is a comprehensive guide to a basic development workflow. Using a simple, but non-trivial web application, we learn how to write tests, fix bugs, and add features using pytest and git, via feature branches. Along the way we'll touch on application design and discuss best practices.
In this installment, we will:
- Talk a bit about the design of the example application.
- Ensure we are set up for development.
- Exercise the basics of pytest, and git by writing some tests, adding a fixture, and committing our changes.
Introduction
Developing a sane and productive workflow is essential to increasing productivity and minimizing risk. Good testing discipline coupled with regimented use of a revision control system is key. The workflow outlined in this guide is the result of many years of experience and discussion of best practices. It is not comprehensive in the sense of total maximization of productivity or utter elimination of risk. Frankly, that's just not possible. Instead we lay the groundwork for more robust practices, like continuous integration and continuous deployment.
This guide is, however, comprehensive in that it attempts to answer all of the basic questions that developers face when collaborating on large code bases.
The workflow is presented using a non-trivial (but necessarily simplistic) example application as a framing device. It is designed to be easy to reason about, and show general good practices. However, it is not optimized or robust. We will discuss areas where we might improve on these aspects, but they're really out of scope for this guide.
Tip
This workflow is a simplified version of the one outlined in the classic A successful Git branching model by Vincent Driessen.
The Example Application
For our example, we'll be building on a simple HTTP API endpoint, implemented in Python 3. This endpoint's primary function is to return a random quote from a pool of quotes previously stored in a database.
The application is built using as few external dependencies as possible, but for added realism, uses a few libraries to handle some of the messier bits.
Limitations and Design Restrictions
The goal of the example application is to provide as realistic a codebase as possible. But there are good reasons to put some simple restrictions on the end product:
- Keeping scope in check. The application should be easy to reason about. If it were to be too complex, like a real-life code base might be, we'd spend too much time explaining the implementation of the features and bug fixes.
- Comfort of the audience. The author hopes that this guide is useful to programmers of all levels of expertise. As such, it's important that the concepts are easy to understand and explain.
- Reducing dependencies (code and infrastructure) We could treat this application as a production-ready project, utilizing a highly optimized web framework, ORM, enterprise-level database, and deploy the whole thing to a PAAS. However, there's a strong desire to allow any reader, with minimal configuration, to jump in and benefit. Design and technical decisions are made with this in mind.
- Be as generic as possible While we're using a specific database, we are generally adhering to well-known standards like WSGI, DBAPI, HTTP, and REST. This should make the application useful as a good example of a generic web application.
In practical terms, this means that the application will:
- Use as few dependencies as possible.
- Use a bundled database product (we're using sqllite3).
- Require no other tooling beyond a console (terminal), git, python 3 and some sort of text editor.
One additional area where the design is being restricted is error handling. Avoiding input verification and exception handling helps keep the code simple.
Preparation
Before we begin, you should do the following:
- Install git
- Install python 3
- Make sure venv is installed (it should be, but some Linux distributions put it in a separate package)
From there, you'll have all the tools you need, save a preferred text editor and a console (or terminal) to follow along.
Note
The guide has been developed with unix-like systems in mind (Linux, BSD, MacOS). It should be possible to follow along in Windows, but this has not been tested. There are some quirks to using git and python in Windows that the author would like to explore in the future. If you are interested in seeing this guide include Windows-specific notes, please contact the author.
We can ensure our tools are installed by opening up a terminal and running the following commands (the output shows what the author was using to develop the guide):
Verify Git
$ git --version
git version 2.20.1 (Apple Git-117)
Verify Python
$ python -V
Python 3.7.3
Verify venv
$ python -m venv --help
usage: venv [-h] [--system-site-packages] [--symlinks | --copies] [--clear]
            [--upgrade] [--without-pip] [--prompt PROMPT]
            ENV_DIR [ENV_DIR ...]

Creates virtual Python environments in one or more target directories.

positional arguments:
  ENV_DIR               A directory to create the environment in.

optional arguments:
  -h, --help            show this help message and exit
  --system-site-packages
                        Give the virtual environment access to the system
                        site-packages dir.
  --symlinks            Try to use symlinks rather than copies, when symlinks
                        are not the default for the platform.
  --copies              Try to use copies rather than symlinks, even when
                        symlinks are the default for the platform.
  --clear               Delete the contents of the environment directory if it
                        already exists, before environment creation.
  --upgrade             Upgrade the environment directory to use this version
                        of Python, assuming Python has been upgraded in-place.
  --without-pip         Skips installing or upgrading pip in the virtual
                        environment (pip is bootstrapped by default)
  --prompt PROMPT       Provides an alternative prompt prefix for this
                        environment.

Once an environment has been created, you may wish to activate it, e.g. by
sourcing an activate script in its bin directory.
Unless you get any errors, or the versions look really dissimilar, you are in good shape.
Workflow Overview

High-level overview of the workflow, showing each git command.
The basic workflow goes like this:
git clonethe repository (orgit pullchanges into an existing clone).- Check out the branch you want to work from (usually
master). - Run the tests.
- Create a new branch for the bug/feature. (
git branch) - Check out the new branch. (
git checkout) - Make the changes.
- Write tests for your changes.
- Increment the revision number. (if applicable)
git commityour changes and tests.git fetchchanges that others may have made.git rebaseto put all of your commits into one log entry and merge your changes.git checkoutthemasterbranch.git mergeto your feature or bug branch.- Fix any conflicts.
- Run the tests.
git tagthe changes with the new revision number (if applicable)git pushthe changes to the remote repository.
We'll explore each step in detail as we progress through the guide.
Cloning The Repository
The first step is to clone the initial version of the example application, from my github repository. But because of the stuff we're going to be doing later, this will be a special two-step process.
First, we need to do a bare clone of the repository. This will give us a remote, that isn't github, that we can clone and work on.
$ git clone --bare https://github.com/jjmojojjmojo/random_quote.git random_quote_remote
Now, instead of cloning my repository from github, we clone random_quote_remote:
$ git clone random_quote_remote random_quote
Any changes we git push in random_quote will only go to random_quote_remote.
Tip
This is a handy way to set up a temporary git repository that you can experiment with without any risk to the code hosted on your shared git server (or github). 🦄
Jumping Around In The Guide
🌈 We have branches for all of the major work done in the series:
part1- All the changes from part 1.
part2- All the changes from part 1 and part 2
qotd- Developer A's feature from part 3.
index-info- Developer B's bug fix from part 3.
part3- All the changes from part 1, part 2 and part 3!
Feel free to git checkout if you need to reset your code, or jump around.
Tip
Use git stash to keep any uncommitted changes for later. See the git documentation for more information. 🦄
Quick Overview Of The Application Layout
The code is provided as a python egg. The source code is contained in src, and the setup.py is located in the main directory.
The application is implemented in the following modules:
random_quote.managersrc/random_quote/manager.py. Provides a class,RandomQuoteManagerthat allows a developer to interact with quotes in the database.random_quote.wsgisrc/random_quote/wsgi.py. Provides a class,RandomQuoteAppwhich is a WSGI application that provides a limited subset of the manager functionality as an API endpoint.random_quote.utilsrc/random_quote/util.py. Utility functions. Contains a function that can create the database schemainit(), and another that will populate a database with quotes contained in a CSV file,ingest().random_quote.testssrc/random_quote/tests/test_*.py. Package that contains unit and functional tests, as well as fixtures (collected inconftest.py).
Other files of note:
setup.py- The configuration file for this python egg. It declares dependencies and establishes the version number.
wsgi.py- Contains an instantiation of the
RandomQuoteAppfor use in manual testing, or possible deployment. src/random_quote/schema.sql- A text file containing the SQL statmenets needed to initialize the database, creating the tables. Used by
random_quote.util.init(). scripts/generate_quotes.py- A python script that uses a Markov chain to generate random, but realistic-looking quotes. (see the
scripts/README.rstfor more information).
Initialize The Virtual Environment
Now that the repo is cloned and we've checked out the master branch, we need to initialize the virtual environment, and install the libraries we need for development:
$ cd random_quote
$ python -m venv .
$ source bin/activate
(random_quote) $ pip install -r requirements.txt
(random_quote) $ pip install -e .
Explanation
We have to first change into the directory where we cloned the code.
We invoke venv using the -m (execute this module) command line option to the python interpreter.
To activate the virtual environment, we tell our shell to execute the commands in a file called bin/activate. This sets some environment variables and changes our prompt.
From there, we can use pip as we would in our system, except the packages installed are installed to the virtual environment, instead of the system.
We use two command-line flags of pip:
- First, we use
-rto install first the files used for development, contained inrequirements.txt. - Finally, we use
-eto install therandom_quoteegg. We specify the current directory (.), since that's where oursetup.pyis. This parameter tellspipto install our project as a "development" or "editable" egg. This means we can change the source code, and we won't have to re-install the egg to see the changes in our python environment.
Application Implementation Notes
Deisgn Approach
The design of the application is in two main parts. We have a data manager, manager.RandomQuoteManager, that handles all interaction with the database. Then we have the WSGI application, wsgi.RandomQuoteApp that provides a web-based API.

Key Classes In The Example Application, "Random Quote App"
Explanation
This is a simplified version of a UML class diagram.
The classes are identified as underlined text. The modules are noted in the green boxes.
Each public (or relevant) method is listed (methods are suffixed with parenthesis), as is each property.
These two classes are shown to be related by a simple two-direction arrow.

Essential API Boundaries
This is done for a few reasons. Primarily, the concept of separation of concerns. The concern of the database interaction, the concern of the web interaction, and the concern of the web client are separated by clear API boundaries.
By doing this, we isolate code that has to be different by its nature. RandomQuoteManager is concerned with managing and retrieving data in the database. RandomQuoteApp is concerned with interacting with web clients. The web client is completely out of our control (a browser like Firefox, a utility like cURL, or another application).
With proper separation, each concern can be optimized for its purpose. RandomQuoteManager can do database interactions in the best possible way - we can employ an ORM someday, or change exactly how we store the data. RandomQuoteApp will still function, as long as its python API hasn't changed.
In the same vein, we can make RandomQuoteApp the best web application possible - we can implement security, or caching - it can evolve into a socket-based API that doesn't use HTTP at all!
Finally, the concerns of the client are theirs alone. Today we may be building our application for use by a single page application intended for a browser client. Tomorrow, the random quote service may be used in a network of microservices, where the client will be another service.
We may write console scripts that use the web API via tools like cURL as part of systems automation.
Whatever the client exactly is, it can be the best client for whatever its purpose. As long as the web API is understood by the client, everything keeps working.
This is entirely in terms of functionality. But there are benefits to this separation for us as developers too.
Having well-separated API boundaries means the code behind those boundaries can be much more simplistic.
Lets take a look at two methods that serve similar functions in RandomQuoteManager and RandomQuoteApp, both called get():
src/random_quote/manager.py
Explanation
This is just one method from the
RandomQuoteManagerclass. It uses the DBAPI interface to sqlite 3 to get a cursor, and execute aSELECTSQL statement.The
connattribute, a sqlite database connection object, is created in the constructor.It then retrieves the data, and then processes it into a dictionary for consumption.
src/random_quote/manager.py
Explanation
This method, from
RandomQuoteApp, accepts aWebOb.Requestobject. It does a regular-expression search for the quote ID in the path of the request (e.g./quote/1234).If there is no ID specified, it makes the router return a 404 "Not Found" response, by raising the
HTTPNotFoundclass as an exception.It then uses the
RandomQuoteManager.get()method, via themanagerproperty, to retrieve the requested quote from the database.A
WebOb.Resoponseobject is created, namedresponse.The returned
quotedictionary is processed into a JSON string, and theresponseobject is configured to send the properContent-Typeheader, and the JSON string as the response body.Finally, the
responseobject is returned.
Both of these methods do essentially the same thing - they retrieve a specific quote from the database, identified by its id. The difference is that one accepts the id as a method parameter, and the other extracts it from the HTTP request.
You can imagine these simple methods could be easily combined into one method.
After all, this is primarily a web application, and there's no specific use case right now for someone using the RandomQuoteManager directly. 🤔
Here's what that might look like:
1 2 3 4 5 6 7 8 9 10 11 12 13 14 15 16 17 18 19 20 21 22 23 24 25 26 27 | class BeginningOfAGiantMessApp:
def __init__(self, db_filename):
self.conn = util.connection(db_filename)
...
def get(self, request):
match = re.search("/([^/]+)$", request.path)
if not match:
raise HTTPNotFound()
c = self.conn.cursor()
c.execute("SELECT id, author, quote, created FROM quotes WHERE id=?", (match.group(1),))
quote = dict(c.fetchone())
response = Response()
response.json = quote
response.content_type = "application/json"
return response
...
|
Explanation
This is a bit of a cutup of what would be a new version of the RandomQuoteApp, named BeginningOfAGiantMessApp as a tongue-in cheek commentary on how this would be a bad idea. 😎
We try to root the example in line with the class declaration and constructor of RandomQuoteApp in src/random_quote/wsgi.py.
We'll need to make a database connection in the WSGI app now, so we had to alter the constructor.
The get() code itself is just an amalgam of the other two methods.
Combining the two methods is pretty straight forward. However, you can see that even with the very simple functionality in this method, things are getting a bit muddy. As the application grows and changes, it will just get worse.
Modifying this amalgam is much more risky. We can very easily break the database code fixing a web API issue and vice-versa. It's hard for two developers to work on this part of the code base concurrently without running into conflicts.
Tip
We will learn how to deal with that situation, however unlikely, in part 3! 🦄
But worse, its also harder to test. This may be one of the biggest advantages to putting thought into separation of concerns, and creating sane API boundaries. When testing the nightmare code above, we have to simulate an HTTP request just to make sure the database works, and we need the database functioning to ensure the HTTP stuff functions. This leads to more complex test fixtures and complex object mocking, and ultimately more fragile test suites.
When writing software, its best to keep our units as small as possible and loosely coupled, so they can be easily isolated. Then our tests are simple and reliable.
The core design of this example application takes this to heart.
Application Design
The application as it stands for this part of the guide incorporates concepts of separation of concerns as explored in the last section:
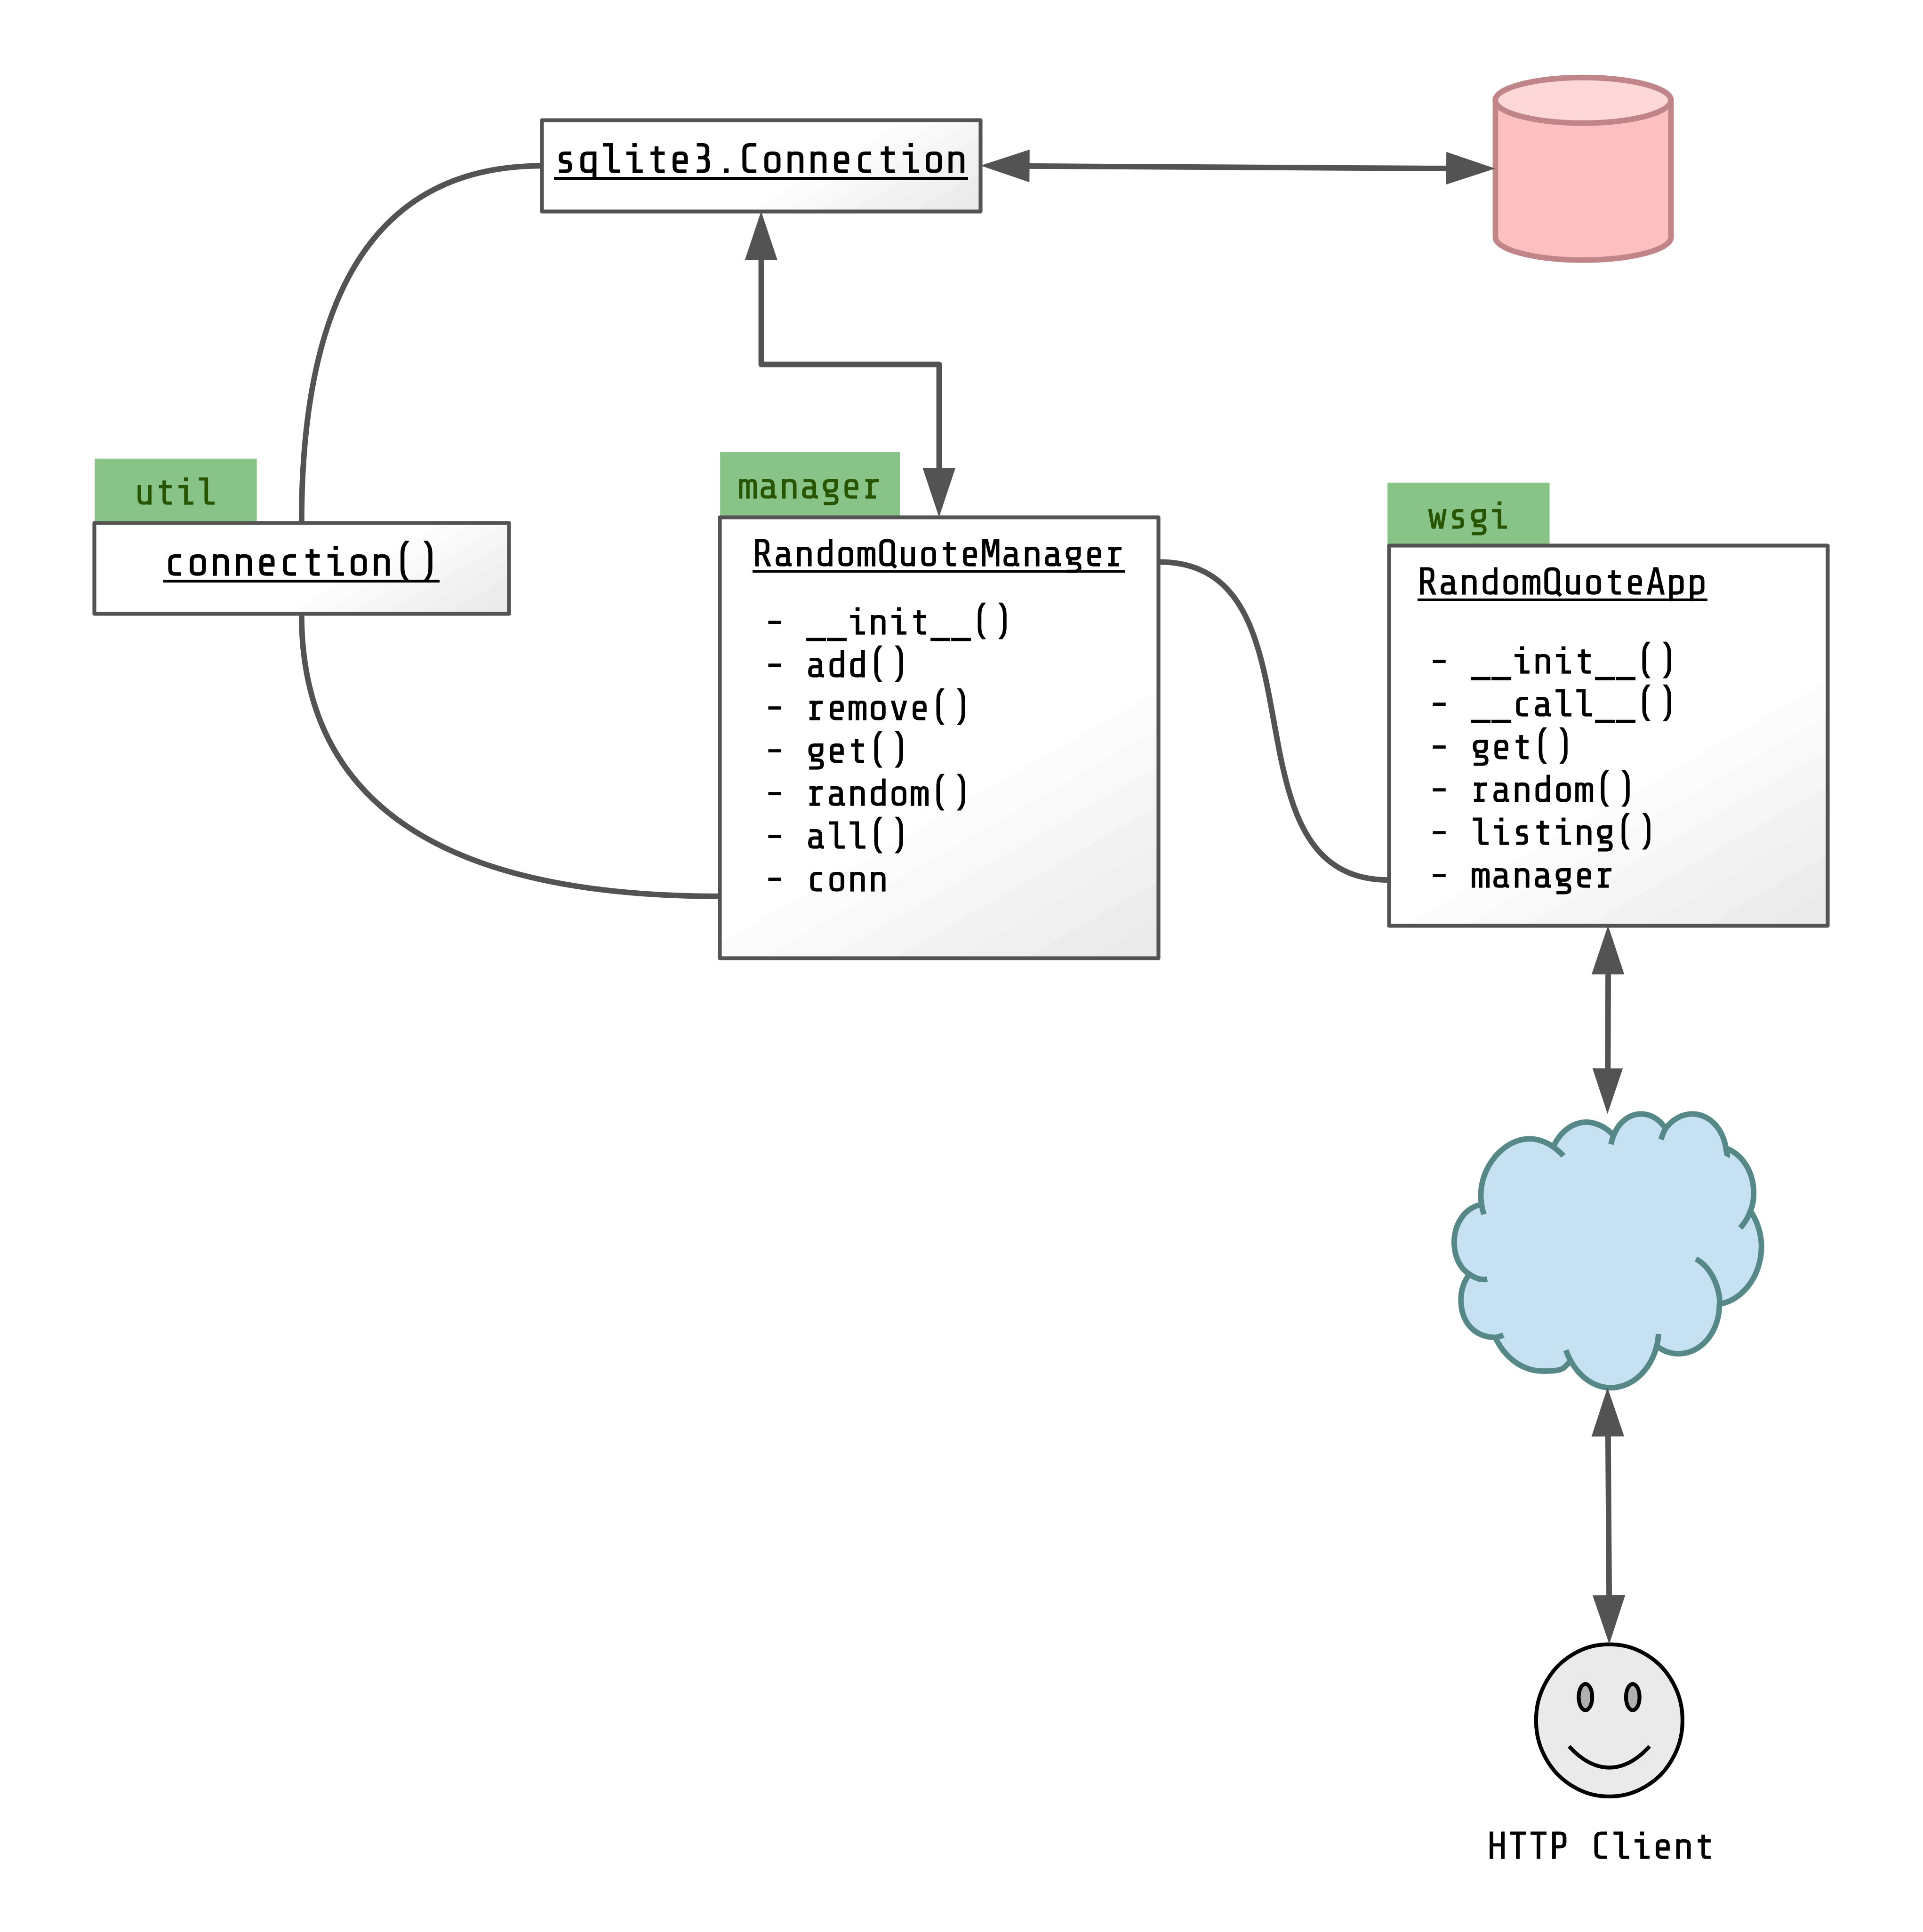
"Random Quote App" Overview
Explanation
This diagram picks up where the last left off. It is again a simplified diagram inspired by UML.
The classes are identified as underlined text. The modules are noted in the green boxes.
Each public (or relevant) method is listed (methods are suffixed with parenthesis), as is each property.
Here we see the database connectivity and the HTTP client as actors in the relationships.
We also add connections between class properties and the classes or functions that provide them.
We take the separation of concerns a step further in the complete application design. We've delegated the construction of database connections to a factory function called connection() in the util module. This way there is a single source of truth for what a database connection looks like, and we aren't duplicating the same connection code in multiple places (the benefit of this will become more apparent later on when we add a new feature that uses the database).
In the diagram above you can see how the classes depend on each other:
RandomQuoteAppcreates aRandomQuoteManagerin its constructor, and assigns it to themanagerproperty.RandomQuoteAppandRandomQuoteManagerboth take database configuration (a filename).RandomQuoteManagerusesconnection()to create a connection.
connection() configures the sqlite connection so all classes that use it will know what to expect.
Data Model
The initial database schema is very simple, but uses a somewhat advanced technique to select random quotes.

We've got a quotes table with four main columns:
id- This is the unique identifier for each quote, and how they will be located. It is a primary key, and will be automatically filled in with the next-highest value.
author- This is the person whom the quote is credited to. It is stored as a text field.
quote- The actual quote. Also a text field.
created- The date the quote was created. This is stored as a text field, since sqlite doesn't have a dedicated date/time field type. We use the
datetime()sqlite function to populate it automatically.
We then have a special column, rand, that stores a random number. It's generated using the sqlite random() function if it's not specified. We've added an index on this column so it can be sorted efficiently.
Here's the SQL command we're using to generate the table (this is locaed in src/random_quote/schema.sql):
1 2 3 4 5 6 7 8 9 | CREATE TABLE IF NOT EXISTS quotes (
id INTEGER PRIMARY KEY,
quote TEXT NOT NULL,
author TEXT NOT NULL,
created TEXT DEFAULT (datetime('now')),
rand INTEGER DEFAULT (random())
);
CREATE INDEX IF NOT EXISTS quotes_rand ON quotes (rand);
|
We use rand to easily get a random row in the table using a simple query:
1 | SELECT id, author, quote, created FROM quotes ORDER BY ABS(rand - random()) LIMIT 1
|
This is a bit more efficient than the usual ORDER BY random() approach, and it has an added benefit: we can fix all the random values during tests if we provide the random numbers in python. You can see this in action in src/random_quote/manager.py, in the RandomQuoteManager.random() method:
1 2 3 4 5 6 7 8 9 10 11 12 13 14 15 16 17 18 19 20 21 22 23 24 25 26 27 28 29 30 31 32 33 | import random
...
RAND_MIN = -9223372036854775808
RAND_MAX = 9223372036854775807
...
class RandomQuoteManager:
...
def _rand(self):
"""
Return a random integer between RAND_MIN and RAND_MAX (simulates
the random() function in sqlite)
"""
return random.randint(RAND_MIN, RAND_MAX)
...
def random(self):
"""
Return a random quote from the database.
"""
c = self.conn.cursor()
rand = self._rand()
c.execute("SELECT id, author, quote, created FROM quotes ORDER BY ABS(rand - ?) LIMIT 1", (rand,))
result = c.fetchone()
return dict(result)
|
Explanation
In this example, we've abbreviated the source of RandomQuoteManager a bit so we can focus just on the parts that are relevant to the random() method.
sqlite3 has a random() function as well. It returns integer values between -9223372036854775808 and +9223372036854775807.
In our SQL CREATE statement, we're setting the default value of rand to random(). This will invoke the sqlite function if a value isn't specified.
We emulate that functionality in our python code so we can interfere with the way random numbers are generated. This is not possible if we were to rely on sqlite to do set the value of rand for us.
Note
See the ORDER BY random() with seed in SQLITE on StackOverflow for some discussion about this topic.
Tip
If you're curious how we might go about fixing the random values, stay tuned, we're going to do that shortly! 🦄
Background For The Uninitiated
This section will briefly discuss the libraries and technology involved, and provide links where you can get more information.
git
git is a distributed source control management system (also known as "revision control" or "version control"). It was developed by Linus Torvalds for use in Linux kernel development. See About - Git for more information about why git is useful.
The documnetation is very good, but quite dense.
venv
venv is a virtual environment manager for Python. The venv tutorial has all the essential information and usage details.
venv superceeds older tools like virtualenv. It's handy because it is now included in the standard library.
Tip
For a nice overview of the virtual enviromnent scene in Python (and to get a sense of why so many are confused by it), an answer to a question on Stack Overflow is about the best I've seen.
sqlite3
sqlite is a robust, but easy to use relational database management system. sqlite3 is the latest version.
sqlite provides the concept of tables containing rows of structured information.
As opposed to other RDBMS', like PostgreSQL, sqlite does not its own server, and cannot be easily shared across machines. Sqlite was chosen for the example project because Python has a built-in sqlite3 library.
The sqlite webstie has comprehensive information about how sqlite works and its capabilities.
WSGI
Web applications are typically executed by web servers, like ngnix, gunicorn, or apache. This abstracts away the need for application code to handle things like managing processes and managing sockets.
To provide that abstraction, web servers support various kinds of gateway interfaces. A common and historically relevant one is the Common Gateway Interface (CGI). It essentially calls for the web server to execute a program like a user might on the command line, streams the request on standard in, and reads the response on standard out. Specific environment variables are defined to convey useful information to the program.
Tip
Reading RFC3875, where the CGI specification is defined is highly recommended for any web developer.
CGI had some rough edges and imposed some limitations that made writing web apps with Python a little more cumbersome. In 2003, PEP333 was submitted (and subsequently superseded by PEP3333), outlining a new way for Python applications to integrate with web servers, that sought to overcome the flaws in CGI.
PEP3333 lays out the specification in detail. The basics are that a WSGI application is a Python callable (a function, a class that implements a __call__() method) that takes a few specific parameters (including a dictionary of gateway information inspired by CGI), and then returns an iterable object, containing the body of the response.
We're using WebOb to handle most of this for us. In RandomQuoteApp, we work with webob.Request objects and return webob.Response objects.
WebOb
WebOb is part of the Pylons and Pyramid projects. It has a narrow scope, designed to help a web developer make sense of an incoming request, and construct WSGI-compliant responses.
Pytest
Pytest is a newer testing framework for Python. It is simpler than, but compatible with, the built-in unittest module.
Pytest uses a convention-over-configuration approach. Test suites and test cases are discovered simply by being named a certain way. However, that discovery process is highly configurable. 😎
Run The Tests
Now that we have the code, we've initialized our environment, and we understand what we're working on, we can run the tests. This is done with the pytest command:
(random_quote) $ pytest src
============================== test session starts ==============================
platform darwin -- Python 3.7.3, pytest-4.6.3, py-1.8.0, pluggy-0.12.0
rootdir: [...]/random_quote
collected 6 items

src/random_quote/tests/test_manager.py ....                               [ 66%]
src/random_quote/tests/test_wsgi.py ..                                    [100%]

=========================== 6 passed in 0.20 seconds ============================
Explanation
This is one of many ways to have pytest collect and run tests. We're specifying a directory to search for, instead of a module or a specific file.
The output above is illustrative of a successful test run.
Initialize The Database And Add Some Quotes
We have utility functions, random_quote.util.init() and random_quote.util.ingest() to create all the tables we need, and insert some quotes to get the database going.
For the sake of completeness, we'll also use the RandomQuoteManager to add a few unique quotes and show how the API works.
First, lets create a CSV file containing some quotes, called quotes.csv.
You can do this using your favorite spreadsheet program, a text editor, or (recommended) use the provided generate_quotes.py script:
(random_quote) $ python scripts/generate_quotes.py
To initialize the database and mess with the API, lets start a python prompt in our virtual environment:
(random_quote) $ python
Python 3.7.3 (default, Mar 30 2019, 03:37:43)
Type "help", "copyright", "credits" or "license" for more information.
>>>
We'll put our database in a file named test.db in the current directory:
>>> from random_quote import util
>>> util.init("test.db")
Now, lets load quotes.csv.
>>> util.ingest("quotes.csv", "test.db")
And we can use the RandomQuoteManager to look at what we've loaded:
>>> from random_quote.manager import RandomQuoteManager
>>> rqm = RandomQuoteManager("test.db")
>>> rqm.get(1)
{"id": 1, "quote":"When I get a little money I buy books; and if any is left, I buy food and clothes.", "author":"Erasmus"...
And we can use it to add a new quote:
>>> rqm.add("Something quite quotable")
1001
The add() method returns the id of the newly created quote.
Note that the author is optional, and defaults to Unknown:
>>> rqm.get(1001)
{'id': 1001, 'author': 'Unknown', 'quote': 'Something quite quotable',...
To exit the console, press ctrl-D, or run the exit() function.
Getting Comfortable With Git And Pytest
As a first step, lets add a new pytest fixture and some test cases. We won't bother doing any branching. This will get us acquainted with how pytest works, and we'll get comfortable with the most basic git commands: git status, git commit, and git push.
Pytest Basics
Pytest uses the concept of convention over configuration to provide a lot of flexbility when writing tests. All you need to do is provide a python module that has the test_ prefix, and fill it with functions that also begin with test_. Pytest will collect these functions and run them for you.
To make a test fail, pytest utilizes the python built-in assert keyword. assert evaluates the given expression, and raises an exception if the expression evaluates to False. Pytest leverages this to make writing tests straight forward: you are simply making assertions about the truth of some expression.
Tip
For more details, see Installation And Getting Started in the pytest documentation.
Here's a contrived test suite (collection of tests) that pytest can run. Save it as test_example.py:
1 2 3 4 5 6 7 8 9 10 | import math
def phi():
return (1+math.sqrt(5))/2
def test_phi():
"""
Ensure phi isn't 2.
"""
assert phi() != 2
|
Explanation
This test suite consists of a single test case, named test_phi(). It has a helper function named phi() that generates The Golden Ratio, also known as ϕ.
This test is non-sensical, simply asserting that ϕ != 2.
As before, we can use pytest to run our test case, but this time we'll specify the file instead of src:
(random_quote) $ pytest test_example.py
============================== test session starts ==============================
platform darwin -- Python 3.7.3, pytest-4.6.2, py-1.8.0, pluggy-0.12.0
rootdir: [...]/random_quote
collected 1 item

test_example.py .                                                         [100%]

=========================== 1 passed in 3.30 seconds ============================
In this case, only the test_phi() test case is run directly by pytest. The phi() function itself is not.
To prove this, we can ask pytest to be more verbose, using the -v flag:
(random_quote) $ pytest -v test_example.py
============================== test session starts ==============================
platform darwin -- Python 3.7.3, pytest-4.6.3, py-1.8.0, pluggy-0.12.0 -- [...]/random_quote/bin/python
cachedir: .pytest_cache
rootdir: [...]/random_quote
collected 1 item

test_example.py::test_phi PASSED                                          [100%]

=========================== 1 passed in 0.01 seconds ============================
The next thing you should know is how to write test fixtures. With pytest, fixtures are just specially decorated functions.
So what are fixtures for? Fixtures allow us to do some set up work before each test is run, and clean up (or tear down) after. In our random_quote application, it's used to create a database and add some data to it. The database is then destroyed after the test.
Fixtures are decorated with pytest.fixture . To use them in a test, you take a parameter that has the same name. If you return a value, it's passed to the test case. If you yield one, the yield ed value is passed, and control returns to your fixture to clean up after the test.
Tip
The terms set up and tear down are fundamental automated testing terms. In a lot of other testing frameworks, test suites have special functions or methods with names like setUp and tearDown that provide the same functionality as pytest's fixtures. 🌈
What's cool about pytest, is that fixtures serve the same purpose, but are much more robust. You can change the scope of a fixture by providing the scope keyword argument when decorating a fixture function. More details can be found in the documentation.
More contrived examples will illustrate how fixtures work:
1 2 3 4 5 6 7 8 9 10 11 12 13 14 15 16 17 18 19 20 21 22 23 24 25 26 27 28 29 30 31 32 33 34 | import math
import pytest
CHANGE_ME = "Hello"
@pytest.fixture
def returned_value():
return "boo"
@pytest.fixture
def yielded_value():
global CHANGE_ME
CHANGE_ME = "Goodbye"
yield "baz"
CHANGE_ME = "Hello"
def phi():
return (1+math.sqrt(5))/2
def test_phi():
"""
Ensure phi isn't 2.
"""
assert phi() != 2
def test_returned(returned_value):
assert returned_value == "boo"
def test_yielded(yielded_value):
assert yielded_value == "baz"
assert CHANGE_ME == "Goodbye"
def test_no_fixture():
assert CHANGE_ME == "Hello"
|
Explanation
In this example, we've set up two fixtures to illustrate using yield and return, named yielded_value() and returned_value() respectively.
To show that something has changed due to using the yielded_value() fixture, we set up a global variable, CHANGE_ME. We use the global keyword to allow our fixture to change a value outside of its scope.
The new test suites, test_returned(), test_yielded(), and test_no_fixture() illustrate how fixtures are consumed by test suites.
test_yielded() shows that we can use multiple assert statements in one test case if we wish.
Note
This is not considered a best practice, and so it should be used sparingly (more discussion on the software enginering stack exchange, but it can be useful to save some typing.
When we run the new test cases, we see everything passes:
(random_quote) $ pytest -v test_example.py
============================== test session starts ==============================
platform darwin -- Python 3.7.3, pytest-4.6.3, py-1.8.0, pluggy-0.12.0 -- [...]/random_quote/bin/python
cachedir: .pytest_cache
rootdir: [...]/random_quote
collected 4 items

test_example.py::test_phi PASSED                                          [ 25%]
test_example.py::test_returned PASSED                                     [ 50%]
test_example.py::test_yielded PASSED                                      [ 75%]
test_example.py::test_no_fixture PASSED                                   [100%]

=========================== 4 passed in 0.20 seconds ============================
Note
For more information about pytest's fixtures, the documentation explains all the cool things you can do with them. 🦄
Now, lets look at some practical examples, taken from our random_quote project.
How pytest is used in random_quote
Here's the current state of src/random_quote/tests/test_manager.py:
1 2 3 4 5 6 7 8 9 10 11 12 13 14 15 16 17 18 19 20 21 22 23 24 25 26 27 28 29 30 31 32 33 34 35 36 37 38 39 40 41 42 43 44 45 46 47 48 49 50 51 52 53 54 55 56 | """
Tests for the RandomQuoteManager class
"""
import pytest
def test_add_quote(preconfigured_manager):
"""
Add a single quote.
"""
id_ = preconfigured_manager.add("This is a really cool quote")
assert id_ == 21
def test_get_quote(preconfigured_manager):
"""
Get a quote by id
"""
quote = preconfigured_manager.get(2)
assert quote["quote"] == 'Generic Quote 2'
def test_remove_quote(preconfigured_manager):
"""
Remove a single quote
"""
preconfigured_manager.remove(3)
c = preconfigured_manager.conn.cursor()
c.execute("SELECT * FROM quotes WHERE id = ?", (3,))
row = c.fetchone()
assert not row
def test_all(preconfigured_manager):
"""
Retrieve a list of all quotes in the DB.
"""
quotes = preconfigured_manager.all()
assert len(quotes) == 20
assert quotes[0]["id"] == 1
assert quotes[0]["quote"] == 'Generic Quote 1'
assert quotes[1]["id"] == 2
assert quotes[1]["quote"] == 'Generic Quote 2'
assert quotes[2]["id"] == 3
assert quotes[2]["quote"] == 'Generic Quote 3'
assert quotes[19]["id"] == 20
assert quotes[19]["quote"] == 'Generic Quote 20'
|
You'll notice that each test case uses a fixture called preconfigured_manager, but that function isn't defined in the test_manager.py file.
Instead, we take advantage of pytest's use of a special configuration file called conftest.py.
Here's what src/random_quote/tests/conftest.py looks like right now:
1 2 3 4 5 6 7 8 9 10 11 12 13 14 15 16 17 18 19 20 21 22 23 24 25 26 27 28 29 30 31 32 33 34 35 36 37 38 39 40 41 42 43 44 45 46 | from random_quote import manager, wsgi, util
import pytest
from webtest import TestApp
import random
import tempfile
import os
@pytest.fixture
def temp_db():
filehandle, path = tempfile.mkstemp(prefix="random_quote_")
yield path
os.unlink(path)
@pytest.fixture
def preconfigured_manager(temp_db):
"""
Create a RandomQuoteManager, and initialize the database.
"""
rqm = manager.RandomQuoteManager(temp_db)
util.init(temp_db)
c = rqm.conn.cursor()
for i in range(1, 21):
rand = random.randint(manager.RAND_MIN, manager.RAND_MAX)
c.execute("INSERT INTO quotes (author, quote, rand) VALUES (?, ?, ?)", ("Unknown", f"Generic Quote {i}", rand))
rqm.conn.commit()
yield rqm
rqm.conn.close()
@pytest.fixture
def preconfigured_wsgi_app(temp_db, preconfigured_manager):
"""
Create an instance of RandomQuoteApp, with a preconfigured RandomQuoteManager,
wrapped in a TestApp instance, ready for functional testing.
"""
app = TestApp(wsgi.RandomQuoteApp(temp_db))
yield app
app.manager.conn.close()
|
You'll note that we have three fixtures defined in this file. The first, temp_db(), creates a temporary file (using the built-in tempfile module) to store the sqlite database. After it returns the path to the temporary file, when the fixture finishes, it deletes it. This is a perfect example of situations where fixtures are particularly useful.
Next, we have preconfigured_manager(), a fixture that uses the util module to initialize the database, then plain SQL statements to pre-populate it. After returning the RandomQuoteManager object, it closes the connection to ensure it's freed before the next test.
We can see how fixtures can be chained in the same way we use fixtures in test cases, as preconfigured_manager() takes temp_db as a parameter. Multiple fixtures can be used as well, by taking multiple parameters, as illustrated by preconfigured_wsgi_app. Pytest ensures all the cleanup is done in the correct order.
Finally, preconfigured_wsgi_app sets up a WebTest.TestApp instance, wrapping a RandomQuoteApp instance. We aren't using the return value of preconfigured_manager() in preconfigured_wsgi_app(), but we do want the database initialization and data population to be done for us. Even though temp_db is used by both fixtures, it is only called once, ensuring that the database path used by preconfigured_manager() is identical to the one used by preconfigured_wsgi_app().
Now that we understand the basics of using pytest, lets fill in some missing tests and do our first git commit.
Something Is Missing! (Writing Our First Test and Fixture)
The last developer who worked on this project (yours truly 😎) has made a pretty big error. We have a good amount of tests, but none of them use the RandomQuoteManager.random() method. It's a big oversight, given that the whole point of this project is to generate random quotes.
Tip
This is a great reason to look into test coverage analysis, in particular the coverage.py library.
If we were using coverage analysis, we'd have noticed that there was a method that wasn't exercised in the tests.
We shouldn't be too hard on our predecessor, since they were put into a tough spot. Our quotes are inserted and retrieved using python's built-in psuedo-random number generation tools (the random module). Every time a function in that module is called (e.g. random.randint()), it will likely produce a different output.
That means that if we were to write a test case for the RandomQuoteManager.random() method, the test case would fail randomly every time it is run. 🤔
Lets see this in action. Here's a test case for RandomQuoteManager.random(), that you should add to the end of src/random_quote/tests/test_manager.py:
58 59 60 61 62 63 64 65 | def test_random_quote(preconfigured_manager):
"""
Retrieve a random quote.
"""
quote = preconfigured_manager.random()
assert quote["id"] == 12
|
Now, if we run the tests, we will likely get a failure (if you don't, try running them again):
(random_quote) $ pytest src
==================================== test session starts =====================================
platform darwin -- Python 3.7.3, pytest-4.6.3, py-1.8.0, pluggy-0.12.0
rootdir: [...]/random_quote
collected 7 items

src/random_quote/tests/test_manager.py ....F                                           [ 71%]
src/random_quote/tests/test_wsgi.py ..                                                 [100%]

========================================== FAILURES ==========================================
_____________________________________ test_random_quote ______________________________________

preconfigured_manager = <random_quote.manager.RandomQuoteManager object at 0x10f6e9908>

    def test_random_quote(preconfigured_manager):
        """
        Retrieve a random quote.
        """

        quote = preconfigured_manager.random()

>       assert quote["id"] == 12
E       assert 10 == 12

src/random_quote/tests/test_manager.py:65: AssertionError
============================= 1 failed, 6 passed in 0.25 seconds =============================
So how do we fix this? We alluded to "fixing" the randomness of our code earlier. How is this possible?
There is a seed() function in the random module that re-initializes the random number generator. It can take a parameter, which is used to provide reproducible randomness.
When used, everything will function properly: if you were to call a random function multiple times under normal circumstances and get a different value, you still would. But the values would be (likely) different, and the same values will be returned. This happens every time that random.seed() is called with the same value.
Here's how that works:
(random_quote) $ python
Python 3.7.3 (default, Mar 30 2019, 03:37:43)
[Clang 10.0.0 (clang-1000.11.45.5)] on darwin
Type "help", "copyright", "credits" or "license" for more information.
>>>
>>> import random
>>> random.randint(0, 10)
6
>>> random.seed(4)
>>> random.randint(0, 10)
3
>>> random.seed()
>>> random.randint(0, 10)
7
>>> random.seed(4)
>>> ramdom.randint(0, 10)
3
See how the first call to random.randint(0, 10) after random.seed(4) always returns 3? This will be the case across machines. Where the initial call returns 6 for me, it will likely return something else for you. However, once we pass a fixed seed, we get reproducible results.
Lets add a test fixture to the top of src/random_quote/tests/conftest.py that calls random.seed() with a fixed value:
9 10 11 12 13 | @pytest.fixture
def fix_random():
random.seed(1)
yield
random.seed()
|
Note
We don't actually yield a value here. This is totally acceptable, but in the future we may want to return something that the test cases can use, like the value we used for the seed.
After the yield, we call random.seed() with no explicit value. That re-seeds the random number generator with the default value, which is the way it normally works (usually it's seeded with the system time).
In order to use this fixture, we just need to pass fix_random as a parameter to preconfigured_manager(). Every test case that uses preconfigured_manager, or any test cases that use fixtures that use preconfigured_manager, will have their randomness "fixed" with the same seed.
Here's the new version of src/random_quote/tests/conftest.py:
1 2 3 4 5 6 7 8 9 10 11 12 13 14 15 16 17 18 19 20 21 22 23 24 25 26 27 28 29 30 31 32 33 34 35 36 37 38 39 40 41 42 43 44 45 46 47 48 49 50 51 52 | from random_quote import manager, wsgi, util
import pytest
from webtest import TestApp
import random
import tempfile
import os
@pytest.fixture
def fix_random():
    random.seed(1)
    yield
    random.seed()
@pytest.fixture
def temp_db():
filehandle, path = tempfile.mkstemp(prefix="random_quote_")
yield path
os.unlink(path)
@pytest.fixture
def preconfigured_manager(temp_db, fix_random):
"""
Create a RandomQuoteManager, and initialize an in-memory database.
"""
rqm = manager.RandomQuoteManager(temp_db)
util.init(temp_db)
c = rqm.conn.cursor()
for i in range(1, 21):
rand = random.randint(manager.RAND_MIN, manager.RAND_MAX)
c.execute("INSERT INTO quotes (author, quote, rand) VALUES (?, ?, ?)", ("Unknown", f"Generic Quote {i}", rand))
rqm.conn.commit()
yield rqm
rqm.conn.close()
@pytest.fixture
def preconfigured_wsgi_app(temp_db, preconfigured_manager):
"""
Create an instance of RandomQuoteApp, with a preconfigured RandomQuoteManager,
wrapped in a TestApp instance, ready for functional testing.
"""
app = TestApp(wsgi.RandomQuoteApp(temp_db))
yield app
app.app.manager.conn.close()
|
Now, running the tests again, we see that the new test case test_random_quote() passes:
(random_quote) $ pytest src
============================== test session starts ==============================
platform darwin -- Python 3.7.3, pytest-4.6.3, py-1.8.0, pluggy-0.12.0
rootdir: [...]/random_quote
collected 7 items

src/random_quote/tests/test_manager.py .....                              [ 71%]
src/random_quote/tests/test_wsgi.py ..                                    [100%]

=========================== 7 passed in 0.46 seconds ============================
Our First git commit
The most basic way to work with git is to make a clone of a repository, make changes on the default branch, usually called master, then git commit, followed by git push.
While it's not best practice to do this most of the time, it's a little less complicated than a fully-baked branch-based development workflow. So we'll take it easy with this first batch of changes, so we can get acquainted with git.
First, we need to ask git what has changed. We do this using git status:
(random_quote) $ git status
On branch master
Your branch is up to date with 'origin/master'.

Changes not staged for commit:
  (use "git add <file>..." to update what will be committed)
  (use "git checkout -- <file>..." to discard changes in working directory)

    modified:   src/random_quote/tests/conftest.py
    modified:   src/random_quote/tests/test_manager.py

Untracked files:
  (use "git add <file>..." to include in what will be committed)

    quotes.csv
    test.db
    test_example.py

no changes added to commit (use "git add" and/or "git commit -a")
One thing you'll notice about git, is that is is very helpful 😎. It tells us which files have been changed, and what to do if we want to git add them to our commit, or remove them (git checkout -- <file>).
We also see files that we haven't tracked.
Finally, git tells us that there are no changes added to the commit, and we can use git commit -a or git add to change that.
Git has the concept of commits. These are essentially groups of changes (or change sets). This is why the modifications need to be added to the commit. As git status has helpfully stated, we can use git add to add individual changes (or untracked files), or we can use the -a flag to git commit to automatically add any outstanding changes (but leave untracked files alone).
We don't want to add any of these untracked files, but we do want to add all of the changes, so we'll go ahead and use git commit -a.
When this command is executed, git creates a temporary file for us, and will bring up our default editor. Git expects us to provide a commit log message.
Tip
Usually, the editor is the vim editor.
You can configure this to be nearly any editor you'd like. Here are some examples from github.
Our commit messages should be descriptive, but not too long. There's no point in mentioning things that git records in the change set, like which files changed or even which code was altered. Instead, focus on stating why things changed, and the overall point of the commit.
Lets go ahead and execute git commit -a:
(random_quote) $ git commit -a
Here's what the content of the file will look like:
1 2 3 4 5 6 7 8 9 10 11 12 13 14 15 | # Please enter the commit message for your changes. Lines starting
# with '#' will be ignored, and an empty message aborts the commit.
#
# On branch master
# Your branch is up to date with 'origin/master'.
#
# Changes to be committed:
# modified: src/random_quote/tests/conftest.py
# modified: src/random_quote/tests/test_manager.py
#
# Untracked files:
# quotes.csv
# test.db
# test_example.py
#
|
Again, we can see that git is quite helpful 😀. Let's add the following to that file:
1 2 3 | Added tests for randomness.
Created a new test fixture that makes random tests reproducible.
|
Save, and exit.
In a git commit message, the first line should be short and give an overview of what was done. The following lines, if any, can provide more detail. We do this chiefly because most git tools only show a truncated version of that first line.
Tip
There is a lot of opinion and different practices revolving around git commit log messages. We've only scratched the surface of what makes a great message, and further, what makes a great commit.
I like the git log standard used by the OpenStack project. Even if you weren't to adopt it verbatim, it's a great outline of things you need to think about when collaborating on a software project. 🦄
Now, looking at git log, we can get a sense of what's been going on:
(random_quote) $ git log
commit f007799b3fa0e45c2ff475930021c0dcea1c63c0 (HEAD -> master)
Author: Josh Johnson <jjmojojjmojo@gmail.com>
Date: Sun Jun 9 17:45:53 2019 -0400
Added tests for randomness.

Created a new test fixture that makes random tests reproducible.
commit c670c79823aa7c1c10add696795ee0f880d77b98 (origin/master, origin/HEAD)
Author: Josh Johnson <jjmojojjmojo@gmail.com>
Dat...
Log entries are listed from newest to oldest.
Tip
On most systems, the output from git log is run through a pager, an application that lets you scroll through a program's output in a user-friendly way.
On my system, the pager is less. You can quit less (or a similar but older tool called more), by typing "q", or control-C.
git log has a few common command-line switches that can make reading the log a little less verbose.
Of particular use, is the --pretty flag:
(random_quote) $ git log --pretty=oneline
f007799b3fa0e45c2ff475930021c0dcea1c63c0 (HEAD -> master) Added tests for randomness.
c670c79823aa7c1c10add696795ee0f880d77b98 (origin/master, origin/HEAD) Added in an import that was accidentally removed
032f770e0300a61989fa40dc971e5a24a43928bb Added a helper script to make re-cloning easier for me while I edit the blog post
22cd1c3266a29e5ed340beaebe75aa398012341c Minor bug fix, removed initial tests that the user of the guide will get to write
685149f3f3817f0f05e10b50c8442961f1b7d034 Minor modifications after working through the blog post; Also added quote generation tool
fdde2d208e7d4920ba50fa7e9a3148d9f9b632e6 Finished WSGI application
71aae3f22ff75164bb53c264470bcbf270108ff1 Finished basic manager functionality and tests
05710c963f86869741b2e5c7d5ab2a2760ac0b1e Got init() and ingress() utility functions working. Updated README.
7dc344ad654f7dcbe9b59ccb28ff432c1eb3a936 Function and method stubs laid out, fixed gitignore
ea81a8a227518baf0ac114ceef4e7c77d02c37ec Initial commit
Try other valid options for --pretty, like short.
Another useful command line option for git log is -n[?] - you can pass any number to limit the log output to just that many entries:
(random_quote) $ git log --pretty=oneline -n1
f007799b3fa0e45c2ff475930021c0dcea1c63c0 (HEAD -> master) Added tests for randomness.
Tip
For more details, see Git Basics - Viewing the Commit History.
One last thing! (Web API Test)
Before we move on, we need to add one more test. We have a test for the RandomQuoteManager.random() method, but we haven't added a corresponding test for the WSGI application, RandomQuoteApp.
Tip
Test coverage analysis would have caught this too! 🌈
Here's our test. Add it to the bottom of src/random_quote/tests/test_wsgi.py:
47 48 49 50 51 52 53 54 55 56 57 | def test_random_quote(preconfigured_wsgi_app):
"""
Make a GET request for a single random quote
"""
response = preconfigured_wsgi_app.get("/random")
assert response.status == '200 OK'
quote = response.json
assert quote["id"] == 12
|
Note that we are receiving the same quote that we got in test_random_quote() from test_manager.py. The random seed is working!
We can run the tests again and see that the new test got picked up, and ran successfully. To be extra-sure, lets use the -v flag to pytest, it will give us more detail about what tests were run:
(random_quote) $ pytest -v src
============================== test session starts ==============================
platform darwin -- Python 3.7.3, pytest-4.6.3, py-1.8.0, pluggy-0.12.0 -- [...]/random_quote/bin/python
cachedir: .pytest_cache
rootdir: [...]/random_quote
collected 8 items

src/random_quote/tests/test_manager.py::test_add_quote PASSED             [ 12%]
src/random_quote/tests/test_manager.py::test_get_quote PASSED             [ 25%]
src/random_quote/tests/test_manager.py::test_remove_quote PASSED          [ 37%]
src/random_quote/tests/test_manager.py::test_all PASSED                   [ 50%]
src/random_quote/tests/test_manager.py::test_random_quote PASSED          [ 62%]
src/random_quote/tests/test_wsgi.py::test_get_quote PASSED                [ 75%]
src/random_quote/tests/test_wsgi.py::test_all_quotes PASSED               [ 87%]
src/random_quote/tests/test_wsgi.py::test_random_quote PASSED             [100%]

=========================== 8 passed in 0.36 seconds ============================
Lets git commit our new test. We'll use the -m flag this time. This way, we can specify our commit log message on the command line, surrounded by double quotes ("). It's really handy for small changes like this.
Tip
Be careful of special shell characters, in messages you pass to the -m switch. If you have to use one, prefix it with a backslash (\).
First, lets check git status to make sure we know what we're committing:
(random_quote) $ git status
On branch master
Your branch is ahead of 'origin/master' by 1 commit.
  (use "git push" to publish your local commits)

Changes not staged for commit:
  (use "git add <file>..." to update what will be committed)
  (use "git checkout -- <file>..." to discard changes in working directory)

    modified:   src/random_quote/tests/test_wsgi.py

Untracked files:
  (use "git add <file>..." to include in what will be committed)

    quotes.csv
    test.db
    test_example.py

no changes added to commit (use "git add" and/or "git commit -a")
Note that now, git status tells us that we are "ahead of 'orign/master' by 1 commit". That's letting us know we have commits that haven't been sent to the master (or git push) since we made our clone.
Ok, so we know what's going to be committed, lets do the commit:
(random_quote) $ git commit -a -m"Added web API test for a random quote"
[master a110267] Added web API test for a random quote
 1 file changed, 11 insertions(+)
Let's Publish Our Changes (git push)
Git is decentralized. There is a place where you got your copy of the code, this is referred to as a remote. Each clone, or working copy of the repository contains all of the changes since the repository was created. We work on our clone of the repository and can view and manipulate any change ever made. We work independently, in perpetuity.
In order for someone else to use those changes, we need to use send our commits to the remote. This is done via git push.
The default name for the default remote is origin. It's not necessary to specify it to git push, but it's a good habit to get into.
Lets push our changes to the master branch:
(random_quote) $ git push origin master
Enumerating objects: 20, done.
Counting objects: 100% (20/20), done.
Delta compression using up to 8 threads
Compressing objects: 100% (11/11), done.
Writing objects: 100% (13/13), 1.19 KiB | 1.19 MiB/s, done.
Total 13 (delta 8), reused 0 (delta 0)
To [...]/random_quote_remote
   c670c79..a110267  master -> master
Before we did this, anyone else who cloned our repository would not be able to see the commits we made. Now that we have, they can run git fetch or git pull and retrieve the commits we made.
Note
We will be exploring multi-user scenarios a bit later! 🌈
Conclusion/What's Next
In this installment, we covered the basics of doing work with pytest and git.
In part 2, we'll dig into how branching works by fixing a bug.